Did you know how to: Format dates, part 2
11th Apr 2014 | Tasha G
Ever wanted to customise the format of dates on your timeline? Now you can! As promised in an earlier blog post, this post is all about custom date formatting options.
With Tiki-Toki, you can set dates to display in a multitude of formats, for example '10th Jan 2010' or 'Wednesday Jan 13th' or just as '1995'. However, you may want dates to be formatted differently to the standard options available with Tiki-Toki. By using the custom date formatting option, you can do just that.
To custom format a date, you will need to enter a special code, which our software will replace with the appropriate value. For example, to display a year you would enter 'YYYY'. To make a month appear, you would enter 'MMMM' for a full month (January, for example), 'MMM' for a short month (Jan) or MM for a numerical month (01, 02, 03, 04 etc).
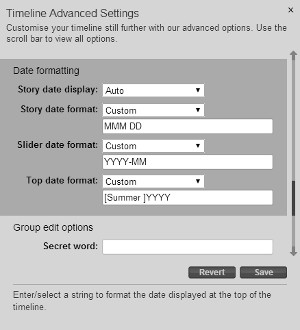
You can combine these codes to format the date as you want. The date format code can include everything from the year down to seconds, and even things like weekday names. We recommend browsing through the standard date formatting options to get a feel for what is available - see the Date formatting section of the Advanced Settings panel (accessible from the Settings tab for your timeline). Standard options include:
Year (e.g., 2010): YYYY
Long month (e.g., January): MMMM
Short month (e.g., Jan): MMM
Numerical month (e.g., 01): MM
Numerical date (e.g., 10): DD
Hour, 24-hour clock (e.g., 09): HH
Minutes (e.g., 25): mm
Seconds (e.g., 25): ss
You can also mix the date format codes with other words and characters. For example, to format a date as '2010-01-10', you would use 'YYYY-MM-DD' for the custom date format. You are not limited to hyphens - you can also use full stops, blackslashes or spaces, whatever you like. You can even enter full words.
Tiki-Toki also offers the ability to force the date to display exactly as some text. You do this using square brackets. For example, let's say you want the date on a story to appear as 'Summer 2014'. To do that, simply use square brackets around the text in the custom date format field: [Summer 2014]. It is also possible to use text in square brackets in conjunction with the special date formatting codes, so that example could be also entered as [Summer] YYYY, where the YYYY would display the year for a particular story.
Once you have decided on the custom format for your dates, you will need to enter it into Tiki-Toki. There are two places you can do this. If you want to use this format globally across your timeline, open the Advanced Settings panel (accessible from the Settings tab), scroll down to the Date Format section, select 'Custom' from the relevant drop down menu, and enter your custom format code. Be sure to click Save before closing the panel!
If you want to format the date for a particular story, and not for the whole timeline, select the story in the admin panel. Then click on the icon to the right of the 'Start date' field. Choose 'Custom' from the date format menu at the bottom right of the panel that appears. Enter your custom format code. Close the panel and click 'Save'.
That should be enough information to get you started on customising your dates. However, if you have any questions, please get in touch at blog@tiki-toki.com.
Thanks for reading!