Did you know how to: Create the Tower of London 3d timeline
6th Nov 2014 | Tasha G
Ever wanted to know how we created our Tower of London 3d timeline? It's all explained here!
For the purposes of this tutorial, we'll assume you're starting off from the 2d view and that you've got your content on the timeline already, so it's simply a matter of changing the formatting. Read below or view the video above for the full skinny.
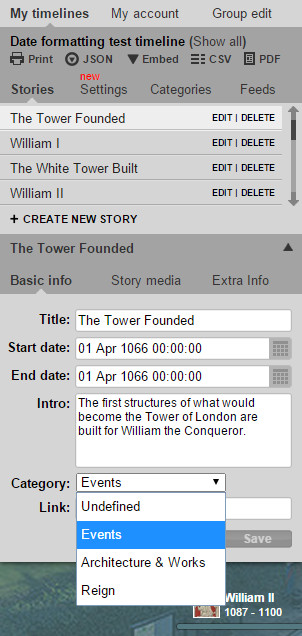
To start off, you will need to set up categories. Open your timeline for editing and click on the 'Categories' tab on your admin panel. Then click on '+Create new category', and enter your category title and select a category colour. Don't worry about changing any of the Category Band Options at the moment. Now you need to go back to your stories and assign each of them to a category. Open the 'Stories' tab, click 'Edit' next to the story and set the category using the drop-down menu close to the bottom of the story panel (see the screenshot). Be sure to save your changes!
Once all the stories have been assigned a category, there are three key settings to change for this timeline. The first key setting is Equal spacing; the second is the Category band view; and the final key setting is the 3d view. First of all, go to the 'Settings' tab on your timeline admin panel and change 'Spacing' to 'Equal spacing 1' and then change the 'View type' to 'Category band'. Click save. Now click on the '3d settings' button and select 'Default' from the 'Status' drop-down menu. Click save before closing the pop-up panel. The main format for the timeline is now in place, though there's still lots of minor changes that can be made to really make the timeline shine.
One minor change is the order of the category bands. To do this, go to the 'Categories' tab on your timeline admin panel and click 'edit' next to the category. Assuming you have three categories, in the 'Order' text field, enter '1' for the band you would like displayed furthest left, '2' for the band displayed in the middle and '3' for the band displayed furthest right. Please note that for the 3d view, the other category band options will make no changes.
Other minor changes include tweaks to the 3d settings. We used a relatively large 'Panel size' and slightly zoomed out so the stories were spaced a bit further apart. You can find out more about all the 3d settings here. Another minor change was setting the title font to 'Arial Black' so the story panel titles popped a bit more. You can customise fonts by going to 'Advanced settings' and modifying the options under the 'Font customisation' section.
Hopefully this will provide the inspiration and guidance needed to create your own gorgeous 3d timeline. If you have any questions about how we did it, get in touch with us at blog@tiki-toki.com.
Thanks for reading!