Do you know how to: Use the 'category bands' view
29th May 2013 | Tasha G
As promised in an earlier blog post, this post will be about getting the most out of the 'category band' view for your timeline. This view is really useful if you have lots of stories, or want to display some stories as events and others as duration.
The first thing to do is to set your view type to 'category bands'. Open your timeline for editing, and click on the 'Settings' tab in the admin panel. The 'View Type' can be changed to 'category bands' through the drop-down menu found about half-way down the tab. We recommend leaving the 'Spacing' as standard if using the 'category bands' view type. Be sure to save your changes! You should now create some categories. For each category you create, a horizontal band will be created on the timeline containing the stories assigned to that category.
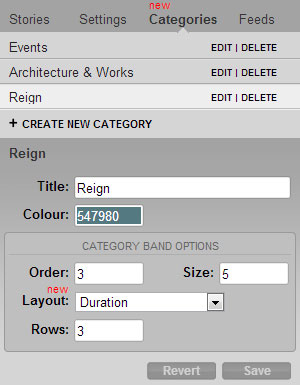
By default, all the category bands will be evenly spaced and all the stories will be shown as events. In order to customise the view, click the 'Categories' tab in your admin panel and then 'Edit' the relevant category. You will now see some additional settings shown under the category title and colour in a separate 'Category Band Options' area.
There are four settings that you can modify here: order, size, layout and rows. We'll go through each setting below, and provide examples from a timeline we're currently working on.
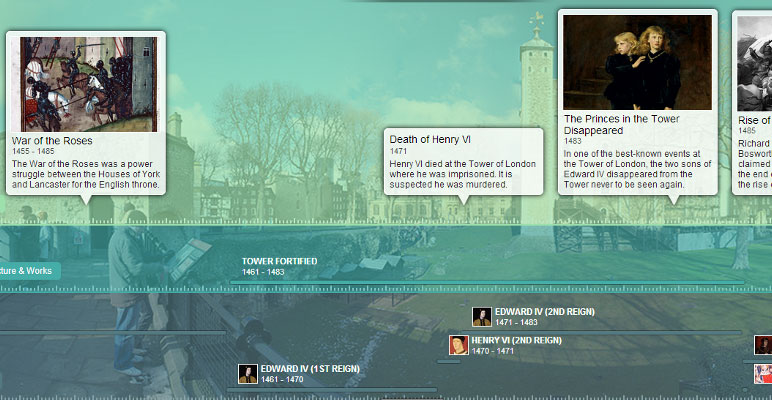
• Order: This determines where the category band will be displayed top to bottom on the timeline. A category with '1' for the order will appear at the top, whereas a category with '10' for the order will appear lower down or at the bottom. On our example timeline, the top category is set to '1', the middle to '2' and the bottom to '3'.
• Size: Size determines how tall the category band is. A larger number will make that band taller relative to the other bands, and a smaller number will make that band shorter. The best way to get the sizing right is to experiment. On our timeline, the top category is set to '11', the middle to '3' and the bottom to '5'.
• Layout: There are only two options for the layout - standard or duration. Standard means that stories will appear as events, even if they span a date range. Duration means that stories with a date range will display as a bar on your timeline, and stories with a single date will appear as a coloured event. On our example timeline, the top category uses the standard layout, and the middle and bottom category use the duration layout.
• Rows: The last option for customisation is the number of rows displayed within the category band. If you have a number of overlapping stories, you will probably want more rows (and will probably also need to increase the size of the category band). On our timeline, the top two categories only have one row each, but the bottom one has three.
That's everything you need to know about the category band view to get started. There is a lot of customisation you can do with this view, and the best way to figure out what works for your timeline is to experiment! If you have any questions, however, please feel free to get in touch with us at blog@tiki-toki.com.
Thanks for reading, and enjoy experimenting with your own timelines!