New feature: 3d timelines
6th Jun 2013 | Tasha G
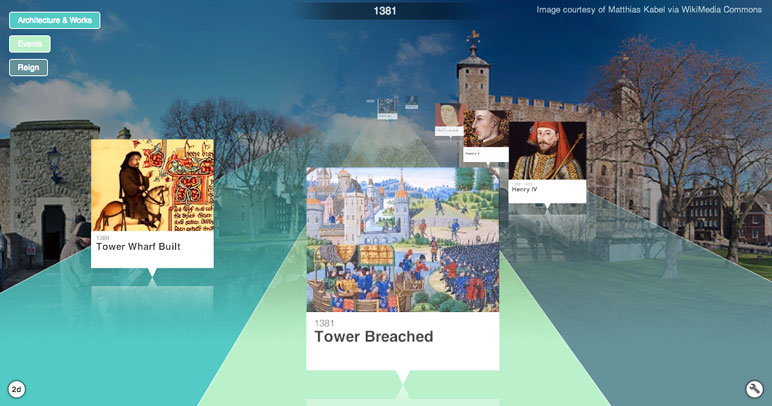
We're really pleased to launch Tiki-Toki's 3d timeline view! See an example here. Both new and existing timelines can now be viewed in 3d. What's more, you can customise how your timeline will appear in 3d to really make it shine!
New to Tiki-Toki? Sign up for our 3d timeline maker by clicking here.
To activate the 3d view for your timeline, open the timeline for editing. Then choose the 'Settings' tab in the admin panel, and click on the '3d settings' button at the top centre. This will open a new pop-up with all the options available for customising the 3d view. We'll walk you through each of the 3d settings below.
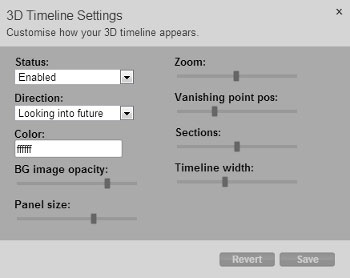
• Status: There are three options available from the drop-down menu - disabled, enabled and default. 'Disabled' means that the timeline will only appear in 2d.
'Enabled' will make a button appear in the bottom left of your timeline so you and your viewers can toggle between the 2d and 3d views, though your timeline will always display to viewers as 2d initially.
'Default' means that your timeline will initially appear as 3d to your viewers, though they can toggle to the 2d version using the button in the bottom left. Please note that the 'Default' option is only available for premium accounts.
• Direction: You can choose whether your timeline will 'look into the future' or 'look into the past'. 'Looking into the future' means that later stories will appear behind earlier stories, and 'looking into the past' means that earlier stories will appear behind later ones.
• Colour: This allows you to set the colour for the perspective lines on the timeline and dates that appear on the side. You can either enter the hexadecimal of the colour or use the colour picker.
• BG image opacity: We found that slightly darker or more opaque images work better for the 3d timeline background than for the 2d background. This option allows you to tweak the opacity of the background image to find the right balance for your timeline design.
• Panel size: The size of your story panels can be made bigger or smaller to suit your needs.
• Zoom: Just like the 2d timelines, this option determines how close the story panels are to each other.
• Vanishing point pos: The position of the vanishing point can be moved up or down.
• Sections: 3d timelines usually start off with five sections, but you can increase the number of sections up to ten or decrease the number of sections down to one. Alternatively, if you use the 2d category band view, the sections will be replaced with the coloured category bands and a category band legend will appear in the top left. You can find out more about the category band view here.
• Timeline width: The width of the timeline can be adjusted to make it wider or narrower as needed.
We recommend experimenting with the settings above to find out what will work best for your timeline, as each timeline is unique.
Technical-minded readers may wonder what technology we have used for our 3d timelines. The good news is that the 3d timelines are created using widely available HTML5 technologies. There is therefore no need for any special browser plugins for them to work. The 3d view even works on iPads and iPhones.
Some older browsers (such as IE6-8) however do not support the latest HTML5 features. In such browsers, the timeline will simply be displayed in the 2d mode instead. All modern browsers have good support for HTML5, so the vast majority of viewers will be able to enjoy your fancy new 3d timelines.
If you have any questions about the 3d functionality, get in touch with us at blog@tiki-toki.com.
Thanks for reading, and have fun making 3d timelines!