Did you know how to: Use Tiki-Toki's new Spans feature
16th Feb 2016 | Tasha G
Have you been curious about Tiki-Toki's new spans functionality, but a bit hesitant to try it out? Fret no more! We will explain how it all works.
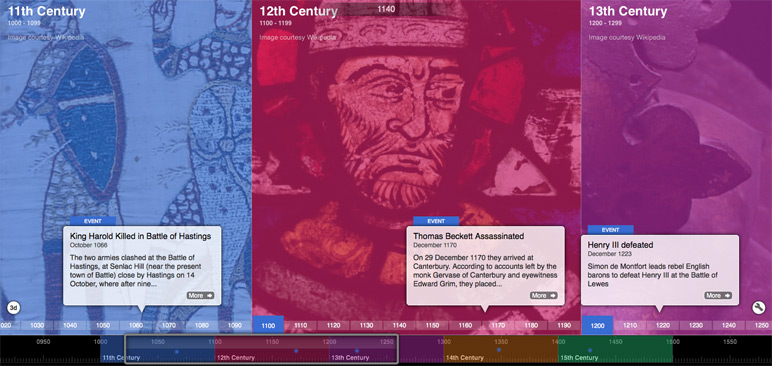
First of all, what is this new spans functionality? You can have multiple backgrounds and set each background to show for a particular period. For example, if your timeline were a brief history of Britain, you could have the Bayeux Tapestry as your background for the 11th century, then change the background to an image of Thomas Becket for the 12th century, and so on. This would be particularly useful on any timeline where communicating epochs or periods is important.
Now, the key question - how does it work? Open your timeline for editing and click on the new 'Spans' tab in the admin panel. Then click '+Create New Span', fill in the information (more on the options below) and click 'Save'. That's it!
Of course, there are a number of options to customise your spans. Here are all the details:
• Title: The name of your span, e.g., 11th century
• Start: The start date and time of your span, e.g., 1 January 1000
• End: The end date and time of your span, e.g., 31 December 1099
• Overlay: The colour of your span
• Opacity: How opaque or translucent the colour of your overlay is
• Text: Choose whether to show or hide your Title and Date on the span
• Color: The colour of your text
• Image: Enter a link to an image. For more options, click on the magnifying glass.
• Credit: Attribution for the background image, e.g., Image courtesy Wikipedia
• Style: Choose between 'Image only', 'Colored overlay with optional image' (your background image will be overlaid with the colour chosen in 'Overlay', and will fade when you scroll out of the span), or 'Colored stage block with optional image' (your background image will also be overlaid with the colour chosen in 'Overlay', but will display as a block over the period rather than fading as you scroll). The example timeline above uses the 'Colored stage block' option. This timeline uses the 'Image only' option.
• Slider: Choose whether to show or hide the span color and text on the timeline slider
Those are all the details to get you started creating beautiful timelines with spans on Tiki-Toki. If you have any questions about spans, get in touch with us at blog@tiki-toki.com.
Thanks for reading!