Do you know how to: Reposition images
2nd Sept 2013 | Tasha G
So you've started work on your fabulous timeline and it's all looking great. But then you notice that Aunt Mabel's famous pink beehive is getting cropped out of the image - what to do?
Fret not, Tiki-Toki allows you to manually reposition story images, to avoid important bits - such as auntie's colorful hair do - from being hidden.
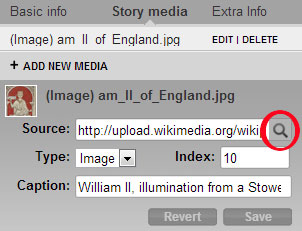
To reposition an image, follow these instructions. Firstly, open the story with the image you would like to position. Then click on the 'Story media' tab and select 'Edit' next to the image in question.
Now, as per the screenshot, click on the magnifying glass symbol next to the image 'Source' field. A panel will open on your timeline. Select the 'Image positioning' button at the bottom right of the panel.
There are two ways to position the image. You can use the drop-down menus at the top of the panel, or you can manually drag the middle image to the desired position.
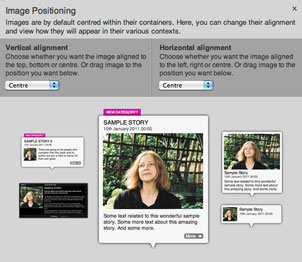
You can see how the image will appear in various contexts as you reposition it. Once the image is positioned as you want, close the panel and click 'Save'.
It's important to note that if your image is portrait, you can only move the image up and down, and if your image is landscape, you can only move the image left and right.
That should see Aunt Mabel's beehive sorted! If you have any questions about image positioning, get in touch with us at blog@tiki-toki.com.